Showing posts with label DIY. Show all posts

Wednesday, May 11, 2016

My kitchen scrap garden


Celery:

Celery is one of the easiest foods to grow from leftover scraps. Just cut off the bottom or base of your celery and lay it in a bowl with just a bit of warm water in the bottom. Keep the bowl in direct sunlight as long as possible each day and after about a week, you will begin to see the leaves thickening and growing along the base. When this happens, you can transplant your celery in soil and wait for it to grow to full length.


Basil:

Basil is relatively easy to regrow. You just have to have a stem about four inches high. Place this stem in a glass of water with the leaves well above the water line. Leave the glass sitting in a bright area but not in direct sunlight. Roots should begin to form in a few days and when those roots reach a couple of inches long, you can transplant them in soil.


Green pepper:

You can grow a number of hot peppers from the seeds that are leftover. Just collect the seeds from your habaneros, jalapenos or any other peppers that you have on hand. Plant them in potting soil and keep in direct sunlight unless it is warm outside and then you can just plant them in your garden area. Peppers grow relatively fast and don’t require a lot of care. Once you get a new crop, just save some of the seeds for replanting again.


Other Veggies you can grow from Scraps:

Lettuce:

Lettuce, Bok Choy and cabbage are relatively easy to grow from scraps. Instead of throwing out those leftover leaves, simply place them in a bowl with just a bit of water in the bottom. Keep the bowl somewhere that gets good sunlight and mist the leaves with water a couple of times each week. After 3 or 4 days, you will notice roots beginning to appear along with new leaves. When this happens you can transplant your lettuce or cabbage in soil.

Lemongrass:

If you love using lemongrass but have a difficult time finding it, simply regrow your own. Lemongrass will grow just like regular grass. You just place the root that is leftover in a glass bowl or jar with enough water to cover it and leave it in the sunlight. After about a week, you will notice new growth and when this happens you can transplant your lemongrass in a pot or in your herb garden.

Bean Sprouts:

If you love cooking with bean sprouts you can grow them yourself as well. You just need to soak a tablespoon or so of the beans that you want to grow in a jar with shallow water. Leave this overnight and in the morning, drain the water off and put the beans back in the container. Cover the container with a towel overnight and rinse them the next morning. Keep doing this until you notice the sprouts begin to appear and then until they reach the size that you want. This works well with mung beans and wheat berries.

Avocado:

Avocado seeds can be used to grow a steady supply of this super food. You just have to wash the seed and use toothpicks to suspend it over water in a bowl or jar. The water should come up enough to cover the bottom inch of the seed. Keep the container in a warm place but not in direct sunlight and remember to check the water every day and add more as needed. It can take up to six weeks for the stem and roots to appear and once the stem reaches about 6 inches you will need to cut it down to 3 inches. When leaves begin appearing, you can plant the seed in soil, remembering to leave about half of it above ground.

Potatoes:

Virtually everyone knows that potatoes can be grown from potato peelings. You need peelings that have eyes on them. Cut those peelings into two inch pieces, ensuring that there are at least two or three eyes on each piece. Allow them to dry out overnight and then simply plant them about four inches deep in your soil. Make sure that the eyes are facing up when planting. It will take a few weeks before you see the potato plant begin to grow.

Sweet Potatoes:

Sweet potatoes can be grown much like regular potatoes. You just have to cut the sweet potato in half and suspend it using toothpicks above a container of shallow water. Roots will begin to appear in just a few days and sprouts will be seen on top of the potato around that same time. Once those sprouts reach about four inches or so in length, just twist them off and place them in a container of water. When the roots from this container reach about an inch in length, you can plant them in soil.

Ginger:

Ginger root is very easy to grow and once you get started, you can keep your supply of ginger full. You just need to plant a spare piece of your ginger root in potting soil, making sure that the buds are facing up. You will notice new shoots and new roots in about a week or so and once this happens you can pull it up and use it again. Remember to save a piece of the rhizome so that you can replant it and grow more for the next time you need it.

Garlic:

Garlic is really easy to grow and can be done from just one clove. When you buy garlic, you get several cloves so just pull one off and plant it with the roots facing down in potting soil. Garlic likes plenty of direct sunlight so in warmer weather, keep it outdoors in the sun during the day. Once you notice that new shoots have established, cut the shoots back and your plant will produce a bulb. You can take part of this new bulb and plant again.

Onions:

Onions are very easy to grow indoors or out. You just have to cut the root of the onion off and make sure that you leave about a half an inch of onion when you do. Cover lightly with potting soil and keep in a sunny area. For green onions, simply put the white base with the roots intact in a container of water and place in direct sunlight. Change the water out every few days and the green will continue to grow. Just snip what you need and allow it to grow as long as you like.

Cilantro:

Cilantro can be grown from scraps as well. Just place the bottom of the stem in a glass of water and leave in a bright area, near a windowsill perhaps. When the roots grow a couple of inches long, you can transplant the cilantro into a pot and you will notice new sprigs in just a few weeks.

Apples:

You can plant seeds from those delicious apples and grow your own apple trees. These are a little difficult but they will grow although you should note that you can plant several of the seeds from a single apple and end up with different types of apple trees. Just allow the seeds to dry out and then plant them. Note that you will need at least two apple trees in order for them to grow well so save more than one seed the next time you enjoy an apple.

Peaches:

Peaches, nectarines and plums can all be grown from their seeds. Note that it does take a couple of years before you will be able to get any fruit from trees that you grow from seed but it will definitely be worth it if you begin now. You just have to dry the seeds out very well to prepare them for planting and plant them in a nutrient rich soil and in an area that gets plenty of sunlight.

Lemons:

Lemon trees can be grown from seeds and if you live in an area that gets really cold winters, you can simply grow dwarf trees indoors. Meyer lemons tend to have smaller plants so choose these if you want an indoor lemon tree. You will begin to get lemons from your tree in just a couple of years so remember that you won’t actually get lemons the same year that you plant them. Just be sure to clean and dry your seeds before planting and choose a soil that is rich in nutrients for the best results.


Alright guys, what did I miss? Do you have a scrap garden at home? Leave me a comment!

Easy DIY No Sew Curtains

You will need:

  •  fabric
  •  one roll of Stitch Witchery (can be found at craft and fabric stores)
  •  iron
  •  ironing board
  •  small, thin, damp cotton cloth
  •  curtain rod
  •  drapery clip rings


1.) Measure your window. Curtains look best when they are hung high and wide. With that said, measure how high you want your curtains hung as well as the width of your window. Record your measurements and make sure you take them to the fabric store. If you're not sure what length will look best go with an extra 3 inches than you think you'll need and have someone else hold them up for you to decide what looks best.

2.) Head to the nearest fabric store and shop away! If you happen to live in the Greater Orlando area check out The Sewing Studio. They are so patient with me every time I go in. (I did have to get my drapery clip rings at WalMart though) Be sure to choose your fabric wisely. Curtains really make a statement, so make sure the color and design are exactly what you want. I like to pull each bolt off the shelf and compare my favorites side-by-side before I make my final selection.

3.) Purchase the correct amount of fabric (feel free to ask anyone who works at the store for help in terms of calculating yardage) and also one large roll of Stitch Witchery (this stuff is magical).

4.) Measure the window one last time and cut (yikes!) your fabric into two equal-sized panels. (Measure twice cut once) Remember you will be “hemming” both the top and the bottom part of the panel, so account for one inch on both ends.

5.) Fold over 1/2 inch of fabric and iron a small seam all the way around each side of the panel. A half inch will be roughly the size of your stitch witchery.


6.)  Insert the stitch witchery inside the seam and press down with the iron for 10-15 seconds in each spot. Slowly iron around the entire panel until the stitch witchery holds  all the seams together. I kept the fabric relatively damp during this process to be sure the fabric didn't burn

7.) Hang the panel on the curtain rod using drapery clip rings (space about 4 inches apart) and Hurray! You have just made a no-sew curtain panel.


These were my first ever curtains, and I was so glad not to have to get kitchen themed curtains for my bedroom. Next time I will buy more fabric so the curtains will be a little longer and bunch more. Overall I was satisfied with my results. I got the idea from restoredstyle.com.

Sunday, April 10, 2016

Easy DIY Wooden Planters

I made these with the same wooden crates that I made my kids holiday boxes with. I picked them up at Walmart for $10 a piece. I then used some of the paint samples we had leftover from picking colors to paint our house. I lined each crate with weed mat, but I also considered using a potting nest type netting. 

You will need:
A wooden crate for each type of plant you plan on planting.
Paint
A staple gun (or nail gun)
Potting soil
Weed matting


Step 1:
Cut your weed mat to fit the wooden crate.

Step 2:
Staple the weed mat to the inside of your wooden crate.

Step 3:
Paint the outside of the crate (preferably with outdoor paint)

Step 4:
Let dry

Step 5:
Fill the planters with potting soil and plant your favorite seeds.

Photos of my process below:


Wednesday, March 23, 2016

DIY Natural Easter Eggs

So with Easter and the Spring Equinox around the corner I thought it would be fun to share some of my favorite traditions with you. I don't hide candy in my yard because well we still have a bag of candy leftover from Halloween. I don't eat it. My kids don't eat very much of it, and overall it ends up being a waste of money. So in keeping with our sort of Unitarian, respect for all cultures, vibe I like to do crafts that respect the origins of Easter.


What You Need:

  • 1 Dozen (or more) white eggs (brown will not work well for this project)
  • Large pots (2 or more for dyeing, 1 for boiling eggs)
  • 1 head of red cabbage (blue, purple dye)
  • 1 beet (red, pink dye)
  • Jars for dyes
  • Distilled white vinegar
  • Old panty hose
  • Twist ties (optional)
  • Leaves, flowers, stickers – whatever you’d like to imprint on the egg


Step 1: Make Your Dye
In a large pot, mix 2 quarts of water and 1/4 cup white distilled vinegar. Then add 1 head of chopped red cabbage. This will make purple and blue dye. Bring the mixture to a boil and then let simmer for several hours until you get desired color. In another pot, mix 1 quart water 1/4 cup white distilled vinegar with 1 chopped beet for a red and pink dye. You can try other fruits and vegetables for other egg dye colors.

Step 2: Boil Eggs
After your dye is made, you’ll want to make hard boiled eggs. In a large pot, add cold water and your eggs. Then bring to a boil over medium heat. Once the water comes to a hard boil, let your eggs boil for 10 minutes. Take out and cool.

Step 3: Put Egg in Hose with Leaf
Take your panty hose and cut 4-inch squares – the hose should be flat – not doubled. Then lay your leaf down on the hose. Lay your egg on top of the leaf then cover with the hose. Make sure it is tight! Then use your twist tie to secure. You want to make sure your leaf is tight on the egg, if not, the dye will seep into the spots and bleed color where your leaf print should be.

Step 4: Dye Eggs
Put your eggs into the dye and let sit for at least 30-45 minutes – or longer if you want darker colors. For the darker eggs let them sit for four hours. You can use several jars to have more eggs dyeing at once.

Step 5: Dry Eggs
Let your eggs dry before taking off the hose! If they are still wet, they can drip into the imprinted spot. Being wrapped in the hose longer also makes them darker. You don’t want them to dry for too long or your egg will pick up imperfections from where they are laying. Make sure the leaf side isn’t touching anything when drying. The perfect time for drying is about 45 minutes to an hour. Unless they are super wet and in that case, try an hour and a half. 

Step 6: Let Leaf Dry
Once you take the hose off, you’ll want to make sure the rest of the egg is dry before pulling off the leaf. This only takes 10-15 minutes, unless your egg is completely dry already.

Step 7: Take off the Leaf
After everything is dry, gently pull off the leaf and see your imprint!


If you're more of a visual learner this YouTube video is a GREAT tutorial.


Thursday, March 10, 2016

How to make unique address change announcements/house warming invitations

The awesome thing about this project is that most of the materials are free. Paint sample chips are the basis for the whole thing.

I picked up some large ones and small ones so that I could hole punch and tie them together with ribbon.

There are a ton of paint chip sample moving announcement card ideas on pinterest so you don't have to do it exactly the way I did. I tried to pick up samples that mostly jived with the colors we picked for our house.

Step 1:
Pick up as many paint swatches as you can! You can find a variety of FREE (yes, FREE) samples at any Home Depot, Lowe’s, or local paint/hardware stores. You need to pick up a stack of the large multi-colored swatches and another stack of the smaller, single colored swatches.

Step 2:
Pick up the remainder of your supplies.
- Adhesive Labels (or name tags)
- Ribbon
- Scissors
- Hole Punch
- Envelopes & Stamps if you plan on mailing these out

Here’s the scoop on the labels, or name tags. You can pick up these cheap, sticky labels at any local office supply store. I bought mine for less than $4 at Wal-mart. I bought one package that contained 80 labels. (You don’t necessarily have to use this size, but make sure your labels will fit on your single colored paint swatches). I’ll let you do that math.

I prefer to use Avery labels because you can use the model number to download the template onto your computer. Once you’ve downloaded your template, it is easy to plug in your text, copy this text onto each label and press PRINT. Yup, it’s that easy! You don’t have any excuses; you can totally make these! I used one size for the front "address announcement" and another size underneath for the "party invite" for those we wanted to invite to our housewarming. The label sizes I used were 25395 and 5422.

Step 3:
Use the downloaded template to type in your message. Once you complete one label, simply copy and paste this same text onto each of the remaining labels and… PRINT!

Step 4:
Put it all together!
Take these new labels and stick them on your small paint swatches…
Stack a multi-colored paint swatch (bottom), with one or two smaller swatches and add a hole punch…
Tie them together with a little ribbon. The biggest decision from here- bow or no bow? You decide.

Step 5:
Add your home announcements to an envelope and send these bad boys out to make your new purchase official!

Photos coming soon.

How to make an AWESOME Fallout Gift yourself

http://www.thinkgeek.com/product/1af2/


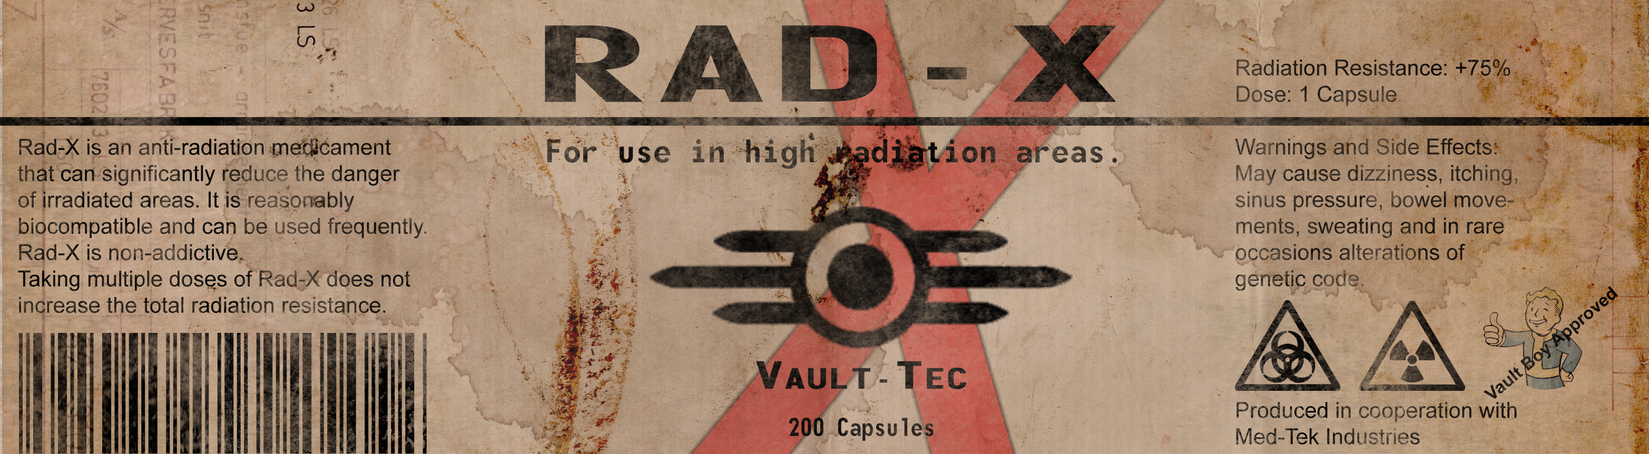
Label, for a Nuka Cola Cherry wrapped around Jones Cherry Zilch


Cram Label wrapped around a can of spam


Radaway Label slapped on a bloodpack energy drink can also be used for blood pack. Alternatively this would also work.


Rad-X label around a Flintstones gummies bottle should do nicely

Here is a tutorial on how to make a Stimpak
Need: Locktight super glue
10mm syringe with plunger
A nail
Pressure Gauge
Strip of Brass 1/4 inch wide completely flat, 8.5 inches long
2 mm craft foam
Exacto knife
Ruler
11/16 outer diameter washer
Kwik Seal
Pliers

Secondary tutorial just in case. I'll probably end up making some combination therein.

Both Jet and Addictol are basically just inhalers, with red handles. Which means I will somehow have to find my inhaler(s)

Med-X is just a metal syringe with purple (or teal) liquid

Nuka-Cola Caps seem easy enough, because deviants before me are amazing. These New Vegas caps are extra awesome


Sugar bombs label goes around a cereal box. I'll have to print it before I decide which cereal box.

Fury/Psycho looks extremely complicated to make, but maybe I can figure it out.. or commission one.

Mentats label should be wrapped around some altoids resulting in something like this


I can't find any x-cell tutorials yet, but hopefully that will have changed by April


Looks easy enough to make an irradiated blood label if I bother buying a green blood pack. I could use that one for all of them, I suppose.

Now all I need is a purified water, deezer's lemonade, dirty water and bobrovs best moonshine label and I should be ready to roll. 

I think I'll pick up an ammo box to put it all in. This particular one would need some green and yellow paint.


Throw in some cases of ammo with labels probably wrapped around match boxes

And maybe some Grognak comics , a you're special book, Tesla Science (on a science journal?), guns and bullets (on a gun magazine?), and a massachusetts surgical journal or 2

Ah a tumblr dedicated just to fallout props *dies*

This girl did a particularly amazing job with hers.


< br /> If you don't want to do it yourself there's someone on etsy who sells them.

Wednesday, March 2, 2016

How to turn cube organizers into bench seats

So, when I bought my house I immediately hated the kitchen and we're going to be doing a lot of renovating in there over the next few months. There's a TON of space but most of it is wasted. So I thought I'd share my first real kitchen project with you all. I made my 3 cube organizers that I'd been using as an entertainment center into bench seats for an eat in kitchen.

What you'll need


  • Cube Organizers. Walmart has cheap ones (that happen to be the ones I was working with)
  • Measuring tape
  • Paint to match your kitchen theme
  • Upholstery fabric, I chose a vinyl from a local shop that I got for a steal. They're closing down their upholstery section so everything was on clearance. 
  • Foam. I got mine from Walmart but ideally you probably want high density foam from Jo-Anns, but my local Jo-Anns had such sub par service I could NOT give them my money, and their prices were crazy.
  • Either thick cardboard or thin plywood
  • Staples and a staple gun
  • Upholstery glue
  • Carpet tape
You should be ready to start your project
  1. Measure twice cut once. Measure everything. How tall, how long, how wide etc. Start with your cube storage.
  2. Make a diagram, seriously this will help you out if you want to shop around for fabric and plywood. 
  3. Cut your plywood or thick cardboard to the top of your cube storage. 
  4. Cut a piece of 1-2 inch foam to fit on top of the plywood or cardboard. 
  5. I suggest gluing it to the plywood but it's not truly necessary. 
  6. Measure and cut your fabric to give you about an extra inch of fabric underneath the foam. You want to wrap your fabric around the foam and plywood and leave an inch underneath to staple on. 
  7. Set your upholstery fabric with light gluing underneath the plywood, and let that dry. 
  8. Staple the fabric to the plywood every 3-4 inches around the entire perimeter.
  9. Add carpet tape around the inside of the fabric to prevent slipping (you can also use velcro on both the plywood and the cube storage)
  10. Place the cushion on your bench and voila! You have a bench seat. 
Pictures are coming soon. I have to upload from my phone and it's being a little odd right now. 

I also did a similar project with my hope chest and I'll outline that in a future blogpost.